In Escape from Tarkov there are many Quests given by the Traders. These are completed to increase your Reputation with the Trader, alongside gaining EXP used to Level up. A lot of Quests can also reduce your Rep with other Trader so keep that in mind when taking on specific Trader Quests. For the ‘Revision – Lighthouse’ Quest given by Peacekeeper is only available after accepting the Discovery Quest titled ‘Revision – Reserve’ as Part 2 to this 3 part Questline for this Trader. Upon completing this Quest you will receive 7,800 EXP which is added to your overall Level. This is our guide on how to complete the ‘Revision – Lighthouse’ Peacekeeper Quest in Escape from Tarkov.
How to Complete ‘Revision – Lighthouse’ Quest
In this Discovery Quest, your objectives are to Mark Vehicles using the MS2000 Marker. To get the 4 Markers needed for the Quest, go into the Trading Window with Prapor. Click on the ‘Special Equipment’ Tab on the right hand side of the Showcase screen. Each Marker costs ₽15177. If you die before you mark the correct vehicles in the Quest, you will lose the Marker and you will have to purchase another once more.
Related: How to Complete The Key to Success in Escape from Tarkov.
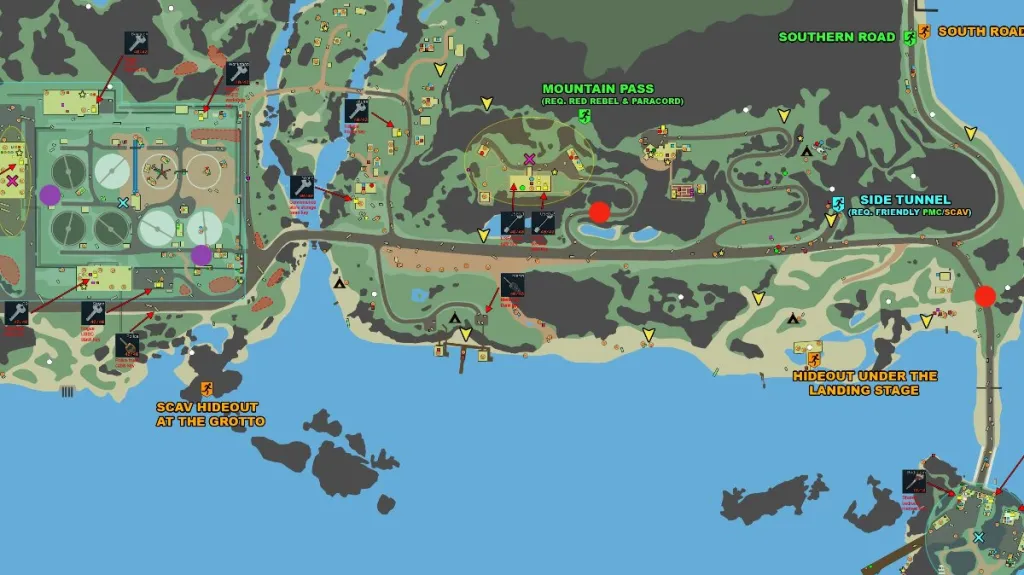
When referring to the Map below, the Stryker locations are highlighted by the red dot on the Lighthouse Map. The BRDM are located as the purple dots on the Lighthouse Map (left side). With every Marker you place you have 30 seconds in which you need to hold the Vehicle position and stay alive. Should you die after waiting out the full length of the timer, do not worry, this Objective is still complete and you will not have to do it again. Alternatively, you can place the Markers inside a Pouch so that they are saved in the event of you dying during this Quest.
Stryker One
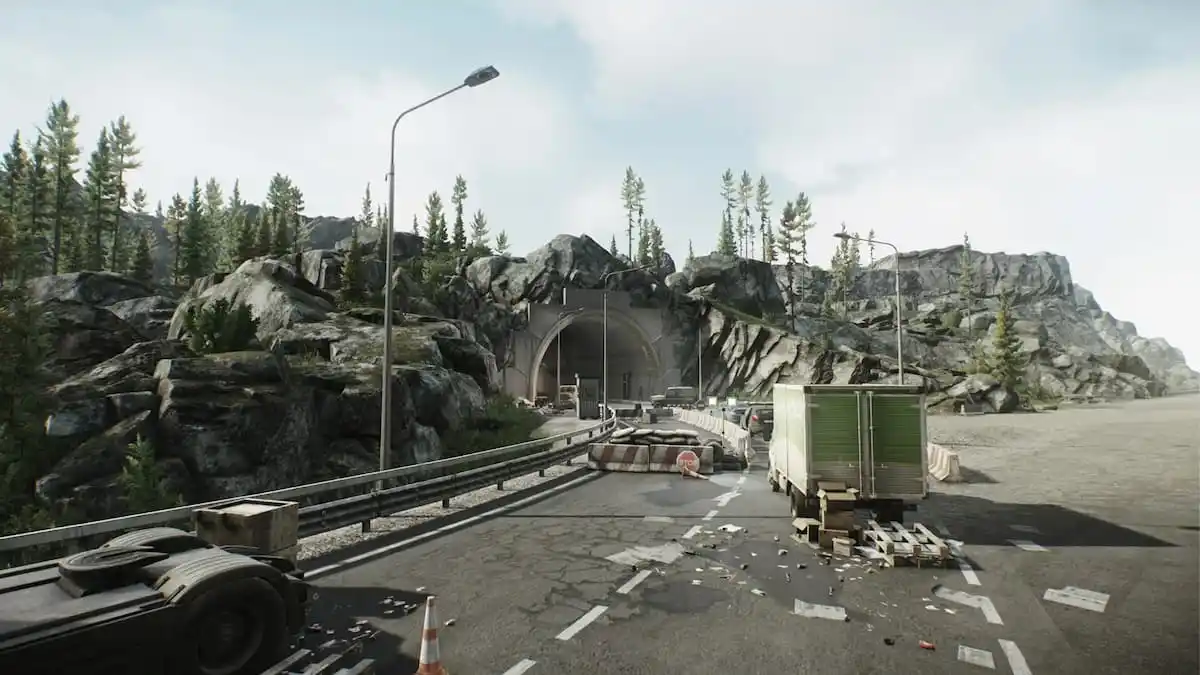
The first Stryker is located on the far-east corner of the Lighthouse Map. Located specifically on the long road south of the Lighthouse itself. This road bends onto the Beach. The Vehicle is located in the middle of the road. Start from the intersection and begin heading down the road which ends at the Lighthouse Landmark. The Stryker can be found past the barriers, trucks and cars left on the side of the road. Finally, you will see the first Stryker just beyond the military jeep. Go up to the Stryker and use the Marker where you will see the green item indicator for you to place the first Marker down in the correct place.
Stryker Two
For the second Stryker, begin heading down the main northern road. You walk to go until you are about half way down towards the main area of the Lighthouse. Take the second right turn onto bendy road into the eastern part of the Map. The second Stryker is located between the first and second bend on this road.
First BRDM
Both BRDMs are found in the Water Treatment Plant, located at the end of the north road. Keep walking north until you reach the large tented areas. Inside the Plant, this BRDM is located on the southern-side of the area. Just past the white van stranded in the middle of the road. You need to specifically stay on this road and walk past Building 1 of the Plant. The BRDM can be found inside the large tent on the right hand side of the main north path inside the Water Plant.
Second BRDM
The second and last BRDM to mark is located further inside the Plant, on the north-east side of the area. This BRDM is located just south of Building 2, if you look around you will see Building 1 far to your left where you would have marked the first BRDM and Building 3 can be seen on your right. This Vehicle is located underneath a canopy like cover.
Tips to Completing this Quest
The enemies require a lot of bullets and have a long time to kill, therefore we recommend that players scope out the Plant from all sides for the Marking of the BRDMs. Check the Sniper Towers located on the edge of the Water Plant and take out enemies from afar using a Sniper. When the surrounding area is clear, make your way into the Plant via the small entrance found on the side of the Plant. You do not need to enter in the south side off the north road into the Plant. Instead, follow the north road around so that you are entering the Water Plant from the most northern side of the Plant. The small entrance is located here. This way you will be incredibly close to the first BRDM Vehicle.
Use Stealth and Be Patient
Enemies do spawn on top of the Plant Buildings, 1, 2 and 3 so make sure you check them from afar (150-250 meters) to snipe them if you need to. You want to remain as quiet and unnoticed as possible. Make sure to sneak through to the areas inside the Plant you need to be in for the BRDMs. Use covers such as other Vehicles to hide from enemies, giving yourself time and space to shoot them in a hidden spot. An enemy is located right beside the second BRDM so keep that in mind when you try to approach the Vehicle thinking the coast is clear.
That is all of the locations of the Vehicles you need to mark for the Quest ‘Revision – Lighthouse’. For more guides in Escape from Tarkov, feel free to look at How to Get SICC Case in Escape from Tarkov and How to Find Tank Battery in Escape from Tarkov. You could also follow us on Facebook for new and updated gaming content. Including Escape from Tarkov, Warzone DMZ, Fire Emblem Engage and Path of Exile.

Published: Jan 20, 2023 02:19 pm