Discovering a sailor’s journal sans its sailor is rarely a pleasant affair. Odds are good that the last entries of the journal will speak of harsh conditions, nonexistent morale, or in the case of the world of Sea of Thieves, terrible otherworldly monsters. Either that, or the entries just suddenly stop, which pretty much says the same thing. If you’re interested in some depressing literature, here are the locations of the Damned Journals in Sea of Thieves.
As part of the Captains of the Damned Tall Tale, you’ll visit the Tunnel of the Damned as you search for Captain Jack Sparrow, who’s currently M.I.A. Following Jack’s Compass through the tunnel and the Whispering Bayou, you’ll come across the wreckage of the Blue Bayou. Contained within is the Flame of Souls, which you can acquire using your lantern. Once you’ve acquired the Flame of Souls, you can light special torches around the Bayou to reveal the Damned Journals, the last words of the unfortunate souls who crossed Tia Dalma.
Sea of Thieves Damned Journals Locations
Here are all five Damned Journal locations in Sea of Thieves:
Journal 1
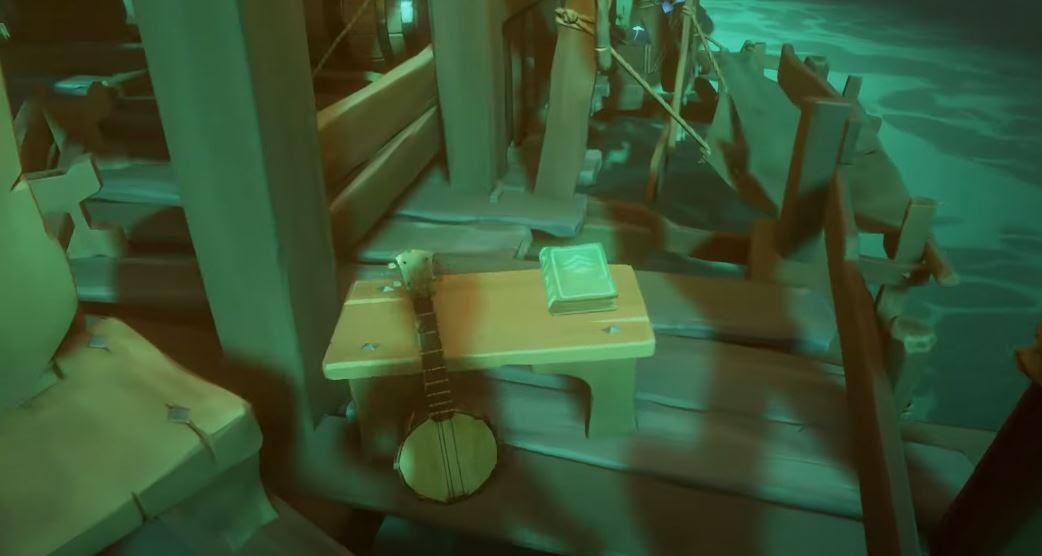
Right after picking up the Flame, head in the opposite direction from your ship to find a small abandoned shack with a bench and a banjo. Light the torch, and the journal will appear on the bench.
Journal 2
On the eastern side of the bayou, you should see two cliffs bridged by a broken mast with two cages hanging from it. Below the lower part of the mast, light the torch with the Flame, then use your gun to shoot at the thinning rope suspending the further cage. After you knock it down, swim out to it and open it up to find the journal inside.
Journal 3
Also on the eastern side, you’ll find another shack, identifiable by its intact stairs and the nearby rowboat covered in barnacles. Climb the stairs and light the torch to your right, and several more torches will light up to show you the way. Follow the path into the water until you find a sunken rowboat with the journal.
Journal 4
In the fort, you’ll find a well surrounded by four unlit braziers. Lighting them will open a trapdoor into the well. What you’re looking for is on the ledge, but if you fall all the way in, you can just climb the ladder back up. In the well, light the torch held by one of the skeletons, and the journal will appear in the arms of another skeleton on the other side of the well.
Journal 5
At the bottom of the same well you found the previous journal is a skeleton holding a lockpick. Pick it up and swim back up the well until you find a small passage. Follow the passage to a locked door, which you can pick open with the lockpick. You’ll be back in the fort proper, where you can use the lockpick again to open a door across the way. Before you go in there, go to the other side of the courtyard to the jail cell with a torch in front of it. Light the torch to make the journal appear in the cell. To actually get it, return to the door you just unlocked, climb up the ladder, and break the rope pulley to make the lift fall. Climb up the lift to the upper level of the courtyard, walk across the ledge, and drop into the jail cell from above to get the journal.









Published: Jun 25, 2021 11:21 pm