Most major games include built-in photo modes these days. Everyone loves to set up their characters in cool poses and take screenshots of them in promo image quality to upload to their favorite social media. It certainly beats taking a camera photo with your phone. Lost Ark has its own photo mode, known as Selfie Mode, but if you want to use it, you’re going to need to do a little extra work. Here’s how to unlock Selfie Mode in Lost Ark.
How to Unlock Selfie Mode in Lost Ark
Selfie Mode is not unlocked immediately when you first start Lost Ark, but it is given to you fairly early on in the main story campaign. All you have to do is complete the level 1 quest “Savior,” which is located in Runa Pass and given to you after completing the quest “Armen Besieged.” You just have to visit Prideholme Cathedral, hang out for a little while until the crowd thins out, then talk to Father Varut. With that, the quest is done, and Selfie Mode is unlocked.
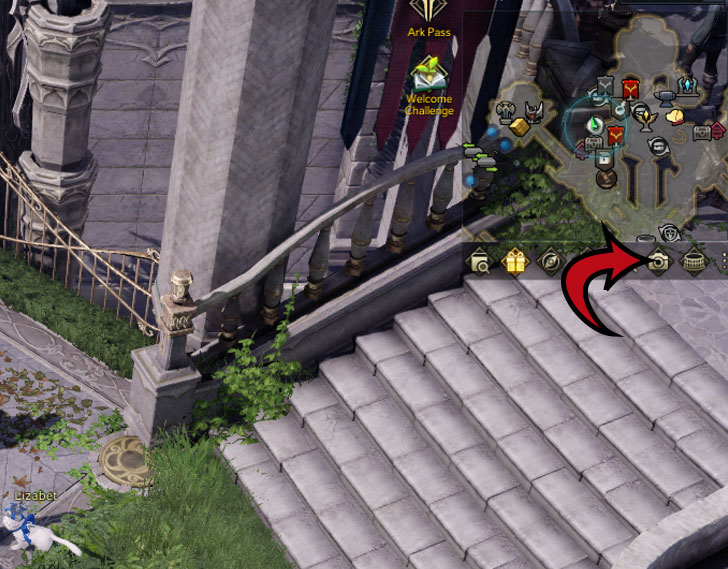
Once Selfie Mode is available, you should see a little camera symbol located underneath your minimap in the top-right corner of your screen. Click that button to start up Selfie Mode, where you can place your chartacter in various poses, change their expression, and toggle the visibility of NPCs, monsters, and other players. If you’re in a party, you can also opt to hide every other player except the ones that are with you.
Once you’ve got the frame all set up the way you like it, press the PrtSc key on your keyboard to remove the UI elements and take the picture. Assuming you’re playing the game through Steam, you can retrieve the screenshot by opening the local files for Lost Ark through your library and navigating to the Screenshots folder.






Published: Apr 22, 2022 05:26 pm