Laika: Aged Through Blood will put you through a tough vengeance journey where you will encounter multiple mechanized bird bosses who will try to make your life in this game miserable. Luckily, each can be defeated outright with the right tricks.
The story will contain major spoilers for the game’s story as well as the ending itself, so make sure you are okay with that. Now, hop in and see what bosses await you and how to spill their brains out!
Related: Is Zagreus in Hades 2? – Answered
How to Beat All Bosses in Laika: Aged Through Blood?
There are 6 bosses in total in Laika: Aged Through Blood, and every one of them will offer you a unique battle that doesn’t resemble any other. After you kill the last boss, you will be sent through an ending sequence that we will describe in this article as well. Even though that last playable sequence isn’t a boss fight, we still wanted to include it in the article.
Here is the whole list of bosses in Laika: Aged Through Blood.
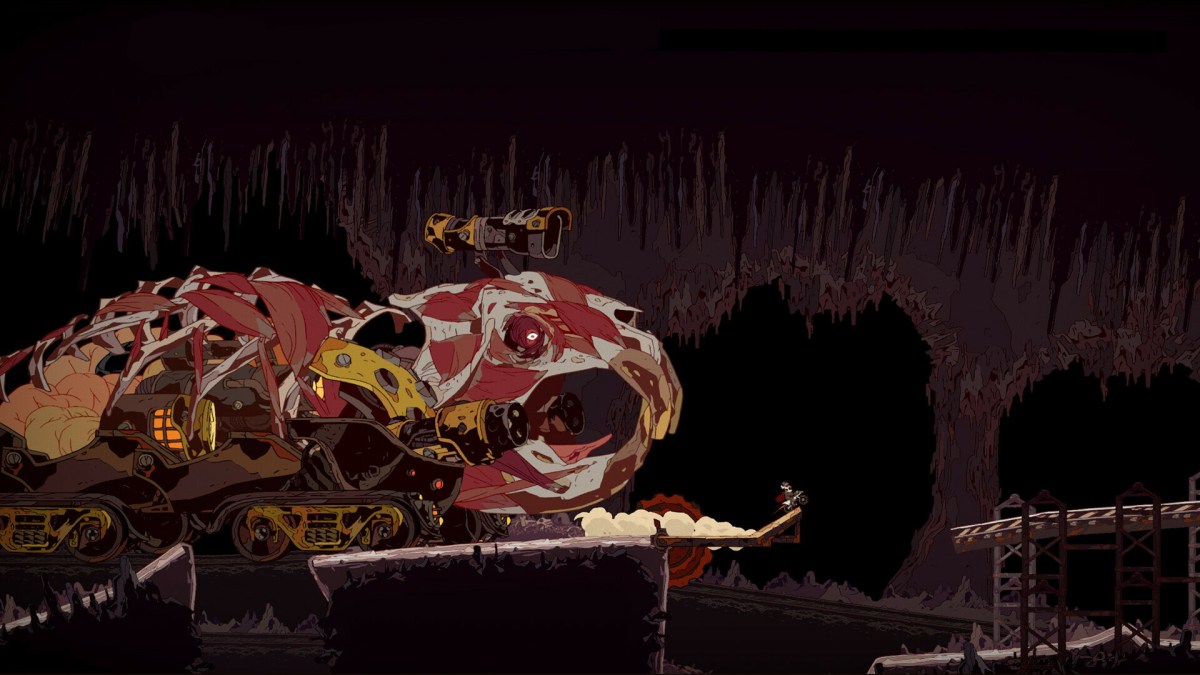
A Hundred Hungry Beaks
As the name of the first boss says, you’ll be fighting multiple beaks in this one. Actually, you will be attacked by an improvised truck with about a dozen beaks loaded up in its truck. It will always ram you from the left side of the screen, and due to it having a ramp on the front end, you will always slide on the ramp before getting a chance to strike at these hungry beaks.
Once you’ve been rammed by the truck and have your Laika in the air, try to shoot as many beaks as possible. Each beak represents one portion of the health bar. Once you shoot all the beaks, you will win the boss fight.
While you are trying to murder the beaks, they will try to knock you by jumping upwards. As if that’s not enough, the moving truck will also shoot at you with the mounted gun, so you will have to dodge bullets as well.
A Long Lost Woodcrawler
Woodcrawler will do its crawling in a rollercoaster style above your head. It will fly from right to left and from left to right while carrying little bird soldiers that will shoot at you. When fighting this boss, you actually don’t have to shoot at the boss himself, but those little soldiers instead.
When you’ve killed the last soldier and brought that HP bar to its last portion, the Woodcrawler will come out of the giant hole in the ground in the middle of the battlefield above which you were driving before. It will open its mouth in an attempt to eat you, and that’s when you need to deal the final blow.
A Caterpillar Made of Sadness
Caterpillar Made of Sadness will fight you in a couple of instances instead of one. He is set up on a rail and will chase you down through an abandoned building and shoot rockets at you. At first, he will shoot guiding missiles from the gun on top of his head. These are pretty slow to activate, so you shouldn’t have too much trouble taking them down.
However, his second attack will be a rain of rockets that will start pummeling down on top of your path. Keep in mind that you don’t need to shoot all of these in order to avoid damage. Instead, shoot the one that is meant to fall just in front of you.
To kill this Caterpillar, you need to wait for those rare moments when he opens his mouth and shows what looks like his brain. After you shoot this brain enough times (3 per encounter, 12 in total), he will die.
A Gargantuan Swimcrab
Get ready to fight a vertical battle with this giant crab. Well, it’s not actually a crab; it’s more like a crab tank controlled by an evil bird. Whatever the case may be, you have to defeat this ugly nemesis, and this battle will take you up, unlike any other previous one.
The Swimcrab will be coming at you from the bottom of the tower, and your charming coyote will need to ride upwards while dodging his dangerous attacks. The crab will have 2 types of attacks: slow-firing bubbles from his claws and quick-firing bombs from the cannon. You can shoot to destroy both of these ammunitions, although I recommend you dodge the slow bubbles and shoot only at bombs that threaten to hit you.
To defeat Gargantuan Swimcrab, you need to always keep your eye on the command post behind the cannon. The bird controlling the crab tank will come out for air from time to time, and that’s when you need to shoot at it. No other attacks can hurt this boss.
Pope Melva VIII
Pope Melva VIII is a weird-looking boss, I admit. It’s a giant ostrich mounted by a golden statue that will try to jump on you and kill you with even odder-looking red balls. This ostrich, which reminds me of a chicken, will be pulled inside its own body most of the time. During that period, you need to dodge his jumping attacks and wait patiently until he pops his head out.
As soon as Pope Melva shows his face, he will shoot one big ball at you that dissolves into multiple smaller red balls when you shoot it. All of these can damage you, so be careful to either avoid them or destroy them as soon as possible.
But the secret of bringing this boss down is exactly when he shows his face. Approach the boss, latch the rope around his neck, and pull to either the left or right side to make him fall down. This will remove 20% of his health bar, meaning you need to perform this action 5 times in total to kill him.
Two-Beak God (Final Boss)
The final boss is a big two-headed bird, which means that the last battle of the game would be 2v1. Nevertheless, even though the Two-Beak God is the last of all of the big and annoying birds on your path in Laika: Aged Through Blood, he is not too hard to beat (if you’ve got strong weapons).
You’ll first get attacked by a single head, but soon enough, both heads will have you in their focus. Their only weapon is their dash towards you, so as soon as you get a grip on these pretty predictable attacks, you will be ready to beat this boss. Simply shoot at the heads (each will have its own separate health bar, which can make this boss battle a lengthy one) whenever you get the chance. I advise you to focus on one only and kill it off as soon as possible so you aren’t in a 2v1 situation the whole time.
Ending Sequence
The ending sequence will put you in a position where you need to chase the dropped bomb and shoot at it before it reaches the ground. The bomb doesn’t have a health bar, and I believe this ending fight is cinematic more than functional. You’ll most likely get to the cutscene where Laika is destroying the bomb regardless of the number of times you’ve shot the bomb.
We hope you enjoyed this article about how to fight all bosses in Laika: Aged Through Blood. For more similar content, we suggest you check out Top 5 Best Roguelites for Beginners and Top 8 Games Similar to Cult of the Lamb.


Published: Dec 6, 2023 08:05 am