This guide will walk you through how to scan QR codes in Animal Crossing: New Horizons. Scanning these codes will allow you to import external images and textures into your game to customize your island. Whether it be memes, music album covers, or celebrity faces, you can import nearly anything you can think of by scanning QR codes.
Before we start, you will need to have a Nintendo Switch Online subscription in order to do this. It’s roughly $20/year for a yearly individual membership. You can visit the Nintendo Switch Online Pricing Plans to learn more about that.
Animal Crossing: New Horizons QR Code Guide
Step 1 – Pull up your Nook Phone
Once you have your Nook Phone open, you will want to open up the Custom Designs app, which is the middle icon.
Step 2 – Open Custom Designs App
This page will contain all of your custom designs in New Horizons. After you do that, grab your phone and download the Nintendo Switch Online App.
Step 3 – Download Nintendo Switch Online App
You can download this on your mobile phone, tablet, or any type of mobile device you have available with a camera. This is what we’ll be using to scan QR codes.
Step 4 – Get Another Device to Scan QR Codes From
Next, you will need a THIRD device to pull up the QR codes on, such as a computer, tablet, or any other device with a web browser. The camera will need to be pointed at this third device in order to scan the QR code.
Step 5 – Open the Animal Crossing: New Horizons Page on Nintendo Switch Online App
Go back to your phone and sign into the Nintendo Switch Online App. Navigate to the Animal Crossing: New Horizons page inside the app. This will open up NookLink. From here you can view your passport, create designs, view your friends, and do other various things.
Step 6 – Open Custom Designs
Tap on the Custom Designs app from NookLink. You will see a button that says “Scan a QR Code.” You can only scan one individual QR code at a time.
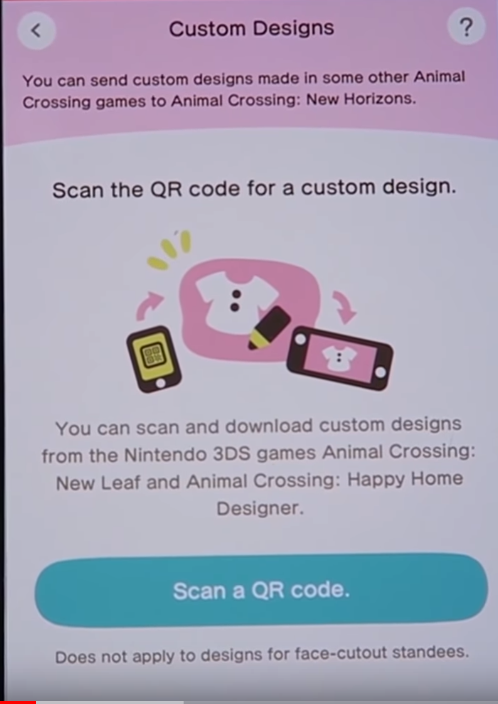
Step 7 – Points Your Device At The QR Code
Point your phone, or whatever mobile device you’re using the Nintendo Switch Online app on, at the QR code on the third device. It will automatically scan it.
Step 8 – Hit the + Button On Your Switch
Hit the + button and it will bring up a message asking if you want to connect to the internet and download a custom design. Tap Download and it will tell you which design just popped up. Confirm it and select a spot to place the new custom design.
- Important note – If you are having issues with this step, you will need to activate NookLink on your game first. Go to the home screen and on the bottom left of the screen you will see a “-” sign. Click that to activate the NookLink. You will then need to reset the Nintendo Switch Online app on your phone after you enable this feature on your Switch.
Step 9 – Display Your New Design
You can now display the imported custom design. Display it on the ground, in your house, on your t-shirt, or wherever you want.
Clothing Items
Scanning clothing QR codes is the same way, except there will be four QR codes instead of one. After you scan the first QR code, a screen will pop up with four different QR codes to scan (shown below).
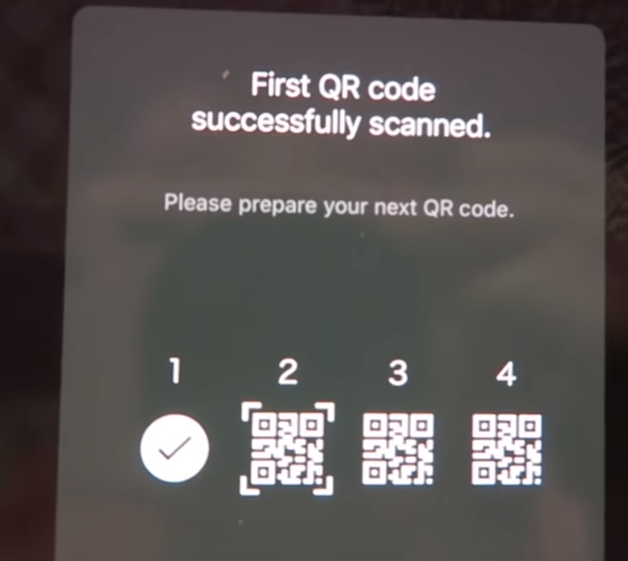
These are all the necessary steps you need to follow to scan QR codes in Animal Crossing: New Horizons. It is a bit of a long process, unfortunately, but it does get easier once you memorize how to do it. Hopefully, this has helped. Here’s a list of our favorite Animal Crossing: New Horizons QR codes to check out in the meantime.


Published: Mar 27, 2020 02:45 am