
Bendy and the Dark Revival, the sequel for the Bendy Universe sees our protagonist, Audrey Drew, trapped inside the Ink Machine. Tricked by the Dark Revival antagonist, Wilson Arch, Audrey is dragged into the nightmare inked world of an animator’s worst nightmare. With 5 Chapters, returning characters and new Bosses to defeat, see our guide into how to beat Bendy and the Dark Revival Bosses.
Bendy and the Dark Revival Bosses
First Boss – Crawling King (Chapter 3)
Second Boss – Lord Amok (Chapter 3)
Third Boss – Alice Angel (Chapter 5)
Fourth Boss – Shipahoy Wilson (Chapter 5)
How to Beat the Dark Revival Bosses
Crawling King
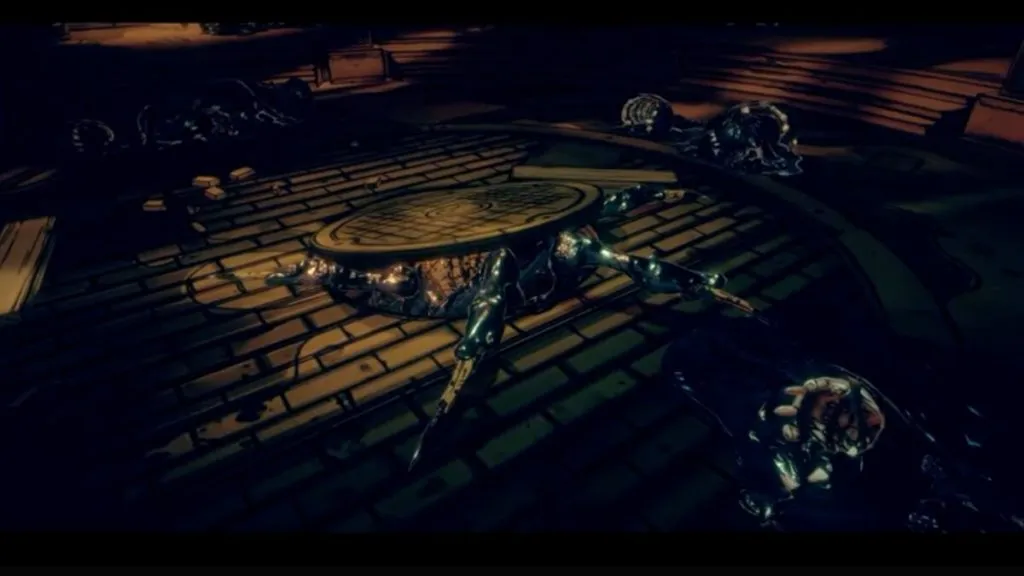
The Goal
The first of the Dark Revival Bosses is the Crawling King. The first thing you need to do in this boss fight is bring down the 4 levers that are on the pillars around the centre of the room. In this moment the Crawling King is not here, instead the King’s minions are after you. Now you can fight these off by hitting them with the pipe, but we recommend that you evade them, going to the opposite side of the room after hitting each lever 3 times with the Gent pipe to close it. The levers will glow with golden sparks, highlighting their locations on the pillars. The levers cannot be found on each pillar so keep moving, evading the Widows whilst simultaneously looking out for that spark indication on the levers.
The Widows
After closing all 4 levers the Crawling King will make his appearance. Get your initial hits in here with the Gent Pipe as the King spends the majority of the boss fight on the ceiling, spitting his minions at you from above. A lot of Widows are sent down, but these are only a 2-hit kill with your pipe. Keep moving whilst picking the Widows off one-by-one. When you have killed enough of them the King will drop down from the ceiling.
Crawling King Attacks
If you lose more health than you would have liked during this fight, then there is a Coffee dispenser in the room that you can use to replenish your health. This costs x15 Slug Tokens. The King can easily be out manoeuvred so if you have lost too much health fighting off the Widows you can easily aim for the Coffee dispenser without worry that the King will catch up to you. The King will spend the majority of the time in the centre of the room. His attacks are quite simple, with a 2-hit piercing attack that is only delivered on his front legs and a sweeping attack which again, only uses his front leg. When he is initiating these attacks, he remains stationary, giving you time to evade.
Defeating Crawling King
Avoid being hit by these attacks by circling the King, moving left or right and focussing your attacks on his back. If you stay too close to him for too long, he will use the sweeping attack, so we recommend swinging the Pipe and moving away straight after. Even if you miss him in your attack, the jumping back will reduce the chances of you getting hit. When you have done enough damage, the King will return to the ceiling and the sequence will repeat itself. It takes roughly 12 successful hits with the Pipe to bring down the King.
Lord Amok
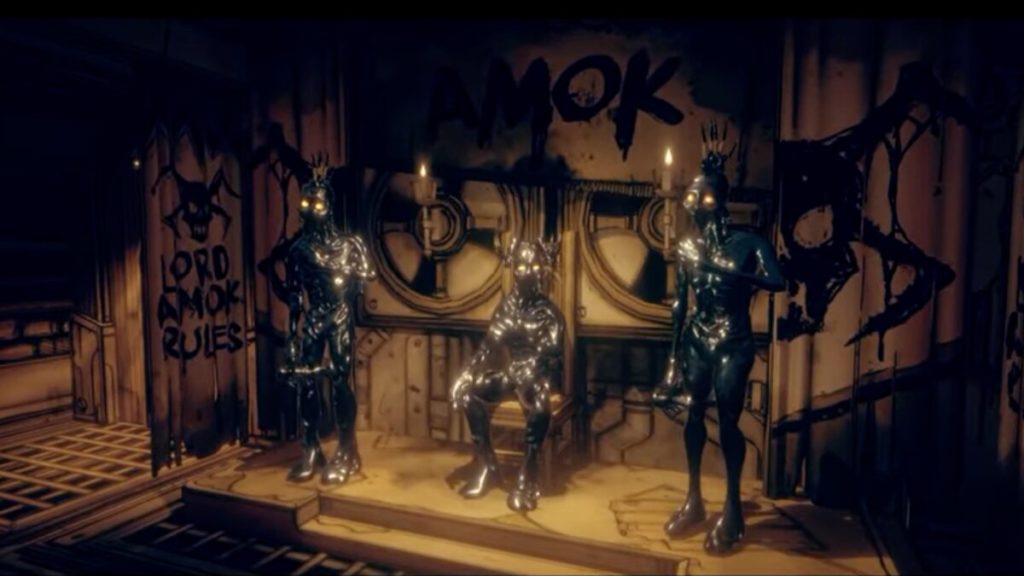
Defeating The Lost Ones
The easiest of the Dark Revival Bosses is Lord Amok. In this fight, Amok sends in his two right-hand Lost Ones to do his bidding. These have a leap attack and close-range combat. These take 6 successful hits with the Pipe to take down. For these we recommend keeping close to the Lost Ones to avoid them using their leap attack. The Lost Ones can leap out of the way of your attacks so keep close and try to attack them together to deal damage to both Entities.
Whilst the Lost Ones may get a complete of good hits in, their damage output is very small and is nothing really to worry about. Keep strafing left and right to dodge their attacks as these are quite small and are delivered in a stationary position (similar to the Crawling King). Once you have defeated the Lost Ones, King Amok will immediately attack so be ready for it. King Amok charges with a quick attack and can deliver these attacks within very quick succession.
Defeating Lord Amok
Amok can be defeated in 8 whacks with the Pipe. We recommend players manoeuvre around the room whilst keeping Amok within a good distance. Your Pipe can reach him at a further distance that his weapon can. Similarly, to when we fought the King, try to circle round Amok. You can stun lock him temporarily with successful hits with the Pipe. After you put the King onto the floor, you can loot his and the Lost Ones bodies, turning them into Ink puddles on the floor whilst gaining a good amount of loot.
Alice Angel

Where on earth did she get a gun from?
Use Your Ability
Alice Angel’s attack rain from above, use the covers around the room to your advance when avoiding the bullets. Use Audrey’s ability to jump across the room and avoid her attacks. Listen out for the sound of when the gun runs out of bullets, this is the prime moment to move. There is a room on the ground floor, to the bottom-left of where Alice is standing. Get to this room. You can use your ability to get across to the other side of the room and entice Alice to use all of her bullets, this gives you a 1 second moment to get to the room safely.
Charging the Gent Pipe
Break the lock on the gate round the corner of the main room. Deposit a fuse into the workstation and play the Gent Pipe into the slot. This will charge up the Pipe. Now with the Pipe charged, return to the main room, hugging the wall on your left. You will see Alice above you, use the platform above (where she is standing) as cover to sneak over to the other side. Remember to hide behind the pillars as cover so that her bullets cannot hit you. Now make your way to the left side of the room, heading to another locked door. Use the Pipe once again to break off the lock. Circle round to the right and take the ladder that is on this wall. There is a giant graffitied arrow pointing to the ladder.
Finding the Levers
Go upstairs via the ladder and turn right, use the Gent Pipe on the door. We recommend that players use their jump ability once again as soon as the door is unlocked so that Alice’s bullets do not hit. If you attempt to just walk in, Alice will unload a mag into your back. Pull the lever inside the room and head back out. Move fast to the cover of the wall beside the gate so that Alice does not see you. Go back downstairs via the ladder and once again use your jump ability to get to the other side of the room. Repeat the same process as before, depositing a battery and recharging the Pipe.
Getting to the Upper Levels
Go back to the main room, here you will see a pile of boxes. Jump on top and look up at the platform above to your left. Use your jump ability to get to the upper floor. Turn right and use the Gent Pipe on this door. Pull the lever in this room. There is a Coffee Dispenser on this floor, to the left of where you jumped up. Use it if you have taken too much damage from Alice. After both levers have been pulled you will get the new pop-up objective to Banish Alice Angel.
Beating Alice
Drop down into the main area once more. Hugging the wall and staying underneath the platform that Alice is standing over. There is another pile of boxes here, jump up and use your ability to get to the upper floor. Turn left ang go through the gap in the boarded-up wall. Sneak round the cover and get behind Alice who will now be in front of you. When you are close enough you will get the prompt to Banish her.
Shipahoy Wilson
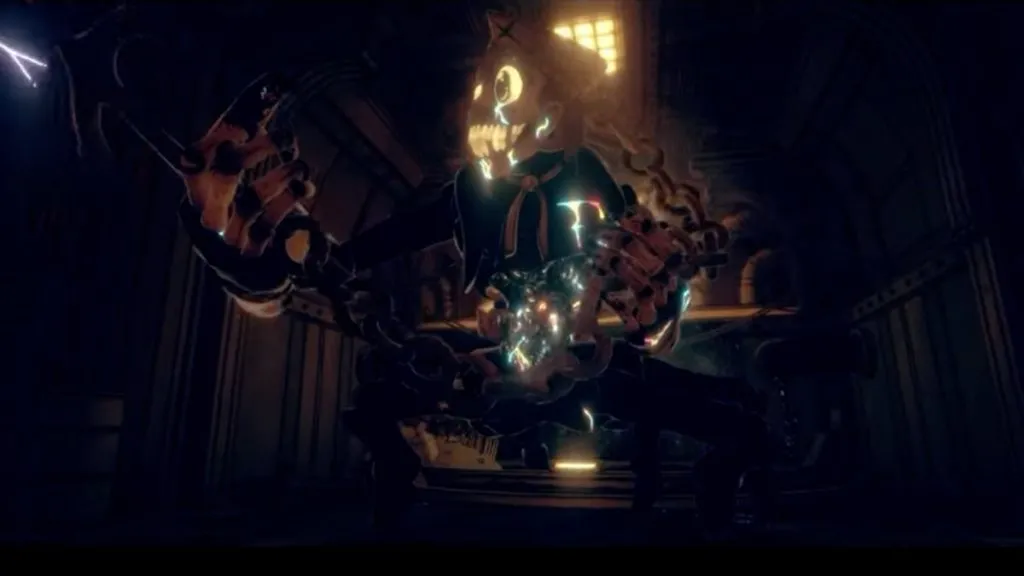
The Goal
Shipahoy Wilson is the last of the Dark Revival Bosses. In the game cutscene Audrey notices a lever to her right. Use it immediately before Shipahoy attacks. Now the goal here is to use Shipahoy’s attacks against him. There are three units in the corners of this room that you need Shipahoy to break open. To do this, you need to wait in front of them until Shipahoy uses his anchor attack. You can easily avoid this attack by waiting for Shipahoy’s roar. When you hear the roar, move away from the unit. Shipahoy will attack where you were standing beforehand as he is locked into this move. You have more than enough time to get away from the anchor before it releases.
The Levers
When all units are broken open, revealing the power down levers inside, head to the back corner of the room. There is an opened pipe with electricity flowing through it. Interact and use the Gent Pipe to recharge the Pipe. Go to the right immediately, using the Pipe on the lever to power down this unit. Shipahoy Wilson will let out a different roar this time, which releases Lost Ones into the room via two doors. One door is directly to the right of the lever you just pulled, the other is behind you, opposite the broken pipe that we use to recharge the Gent Pipe. The Lost Ones here are a one-hit, so take these out before Shipahoy starts his next attack.
New Move: Cog Throw
Shipahoy’s new attacking moves are throwing cogs at the players. Avoid being hit by the cogs by strafing left and right. The Pipe needs recharging again so return to the broken electrical panel once more. Now use the Gent Pipe on the lever to the left of Shipahoy. After this, you have enough time to recharge the Gent Pipe for the final time. Shipahoy will start throwing cogs once more, get to the other side of the room, to the right of Shipahoy to use the Gent Pipe on the final lever.
Using The Interact Cutscene To Your Advantage
The cogs do not hit you when you are locked into place either recharging the Pipe or using the levers in the room. Because of this, we recommend players do go for the levers as quickly as possible to reduce the chances of Shipahoy’s attacks hitting you. When all four levers are powered down, more Lost Ones will enter the room. Clear the room but keep moving, the Lost Ones do close-range attacks. After all Lost Ones are defeated, Shipahoy will approach you.
The Battle: Heavy Attacks
What players will want to do here is keep a distance from Shipahoy, his heavy attacks put him in vulnerable positions so wait for him to swing, evade the attack and then punish by putting all your attacks into his back. Shipahoy’s attack is relatively slow and gives you more than enough time to evade. You should be able to get in 5 hits as long as you are relatively close to him after he has swung. You can entice these slow, heavy attacks by getting close to Shipahoy and then quickly running away, he will swing when you are in close proximity to him.
The Swinging Anchor
Do not over-extend when getting hits in, take your time and this will be a quick fight. If you attack when he pulls his weapon from the ground, you will not be able to evade his quick attack in time so only time your attacks in those 3 seconds of him trying to pull out the weapon. Shipahoy then switches to another heavy attack where he swings the anchor around above him head, the anchor lands behind him, exposing Wilson’s face in the stomach of Shipahoy. Here you can get in a good few hits directed at Wilson’s head. Do not focus here too long, get in 3 hits at most and back off as Shipahoy will release his heavy attack, swinging the anchor over his head and into the space in front of him.
Repeat The Process
Now you have seen all of his moves, repeat the same process as mentioned above. To summarise: 1. Get close to provoke a swinging attack, move away immediately. 2. As he is trying to pull out the anchor from the floor, hit his back with the Gent Pipe. 3. When he is swinging the anchor above his head wait until Wilson’s head is exposed for you to hit it. 4. Move in and hit Wilson. After 3 repeats of this process, hitting Wilson a total of 9 times, the final Boss Fight will end.
That is our Guide to beating Bendy and the Dark Revival Bosses. For more Bendy Universe content, see our related article: All Characters in Bendy and the Dark Revival.


Published: Nov 17, 2022 07:29 am