Upon completion of Splatoon 3’s story mode, “Return of the Mammalians,” as long as you’ve completed each level, you’ll earn the right to challenge the ultimate gauntlet, “After Alterna.” I say ‘ultimate’ here, as this bonus level earns its place among the most difficult obstacles in gaming as a medium. I say that with the straightest of faces.
“After Alterna” is an additional kettle that’s unlocked only after you’ve completed each level in the story mode. To accept the challenge, enter Alterna and (al)turn around. You’ll see the kettle on the cliff where you initially landed in the beginning of “Return of the Mammalians.”
It’s important to note that there is a cost of 333 Power Eggs per attempt. As such, you’ll probably spend a couple thousand eggs before you even come close to completing this behemoth. “After Alterna” is made up of four distinct areas that’ll test your abilities, skills, and endurance. It is effectively Splatoon 3’s answer to Super Mario Odyssey’s “Dark Side of the Moon” or Crash Bandicoot’s “Stormy Ascent.” It is hard.
Phase I: General Platforming
Phase 1.1: Rotating Platforms
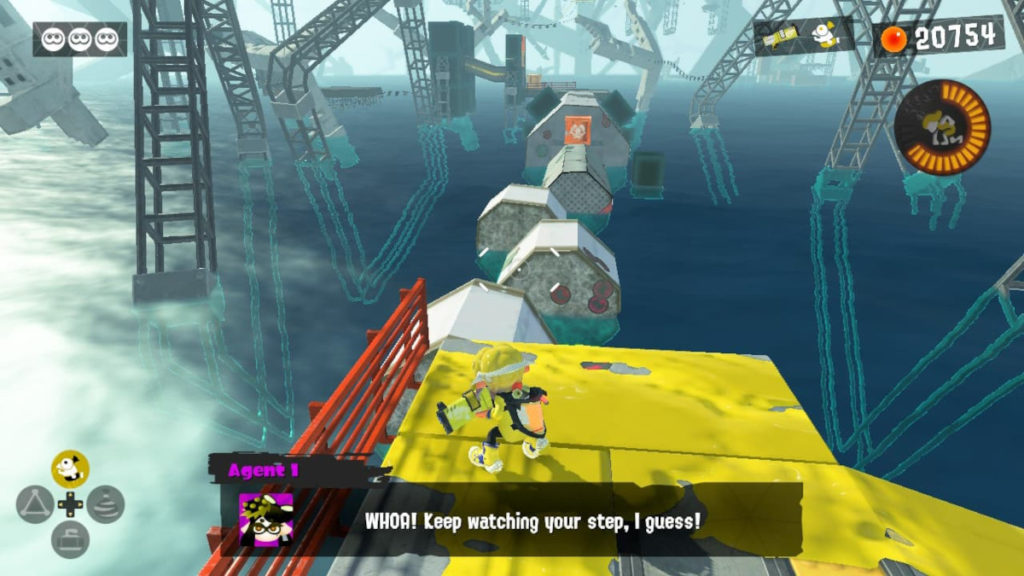
OK, so … it should be noted that this first area will either make you or break you. If you’re having a bad time here, you’ll likely struggle with the entire experience. I don’t say this to dissuade you. I only want you to know just what it is you’re getting into, here. In this first phase, you’ll be tested on your platforming and general survival skills. It starts off easy enough, with a multi-platform obstacle with a couple of octarians that you’ll need to take down.
Take these enemies down, but be careful! Three more octarians will spawn immediately afterwards. End these affronts to existence and move on to the next obstacle. You’ll see four rotating platforms that you’ll need to jump between in squid/octo form. Be sure to ink each of the platforms beforehand! As you reach the elongated platform, an octarian will spawn to your right, so quickly dispatch them and move on. To reach the next obstacle, ink the side and travel upwards in squid/octo form.
Phase 1.2: Mind the Gap

In this next challenge, I highly advise you to make good use of Smallfry. If you throw them upwards in an arc, you’ll be able to distract the two octarians long enough to get in close and end them. Be sure not to go too far, as there is a gap between this rotating platform and the next one! Mind the gap!
Give yourself a pat on the back, because … you’re nowhere near the end. Travel upwards and use the boost to surprise the three octarians on the platform below. It’s here where you’ll need to use an ability that I never used through the main story. In fact, I didn’t even know you could use it. But, apparently, you can. To reach the ledge above, you’ll have to use the Squid Surge, which is achieved by pressing B when you’re traveling upwards in your squid/octo form. I actually only found out how to accomplish a Squid Surge whilst writing this piece. I only ever made it happen by pressing all of the face buttons at once. *visceral scream*
Phase 1.3: Snipers ‘n Smallfrys

Pop the balloon to defeat the flying octarians and paint the wall simultaneously. Jump to the vertical wall, and begin your ascent. I hope you’re experienced with the Squid Surge, as you’ll have to use them multiple times before you’re on solid land. Time the Squid Surges right, and you’ll reach the next obstacle, which isn’t that bad, in all reality.
Turn the corner and take out the two octarians and be careful of the sniper! Climb the wall to your right and take out the octarian before immediately diving into ink and dodging the sniper. Continue along the path and you’ll see a spinning rectangle; paint one (or more) sides and — in squid/octo form — jump into the wall, being careful not to fall. As soon as you can safely land on the other end, do so, and end the sniper.
It’s here where you’ll want to make use of Smallfry once again. Further up, you’ll notice two horizontal octarians and one sitting right-side up. Use Smallfry to take one (or more) of them out, as they can be tough to eliminate in the small space provided. As soon as they’re gone, climb up the wall to the left and do a Squid Roll to land on the platform where the right-side-up octarian was. Look upwards and you’ll see another balloon that can be destroyed to paint the opposing wall.
Phase 1.4: I Have No Mouth And I Must Scream

I hate everything about this next phase. It requires extreme precision. Use the wall ahead of you to do another Squid Roll, then one more until you’re on level ground again. Destroy the boxes here for some Power Eggs, then use the boost to move ahead. I hope you saved your Splashdown Special, as this next obstacle is made easier with one handy. Ink the suspended rectangle ahead of you, then jump into the ink. It will begin moving downward. If you make proper use of the camera here, you’ll see two octarians on the platform below. As soon as you know you won’t fall, use your special and take them out.
I hope you’re experienced with this trend of ‘jumping into ink and moving along with a platform,’ because this next obstacle uses it — twice! In a row! Ink the rectangle ahead of you and jump inside. Be careful not to get too close to the edges to avoid falling off by mistake. Halfway through, you’ll have to transfer to another rectangle, which will take you the rest of the way. Be sure to be precise, as one wrong move here will send you all the way to the beginning. If anyone knows how that feels, it’s me.
Phase 1.5: Ride the Rails, brah!
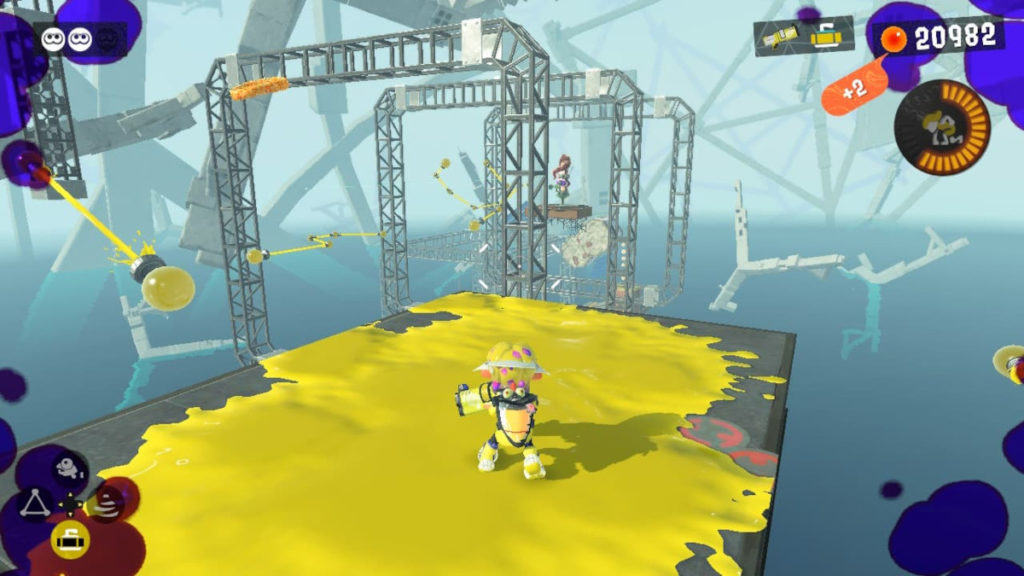
I know you have no reason to believe me, but we’re almost done … with the first phase. OK, so you’ve fallen to the platform below and managed to avoid drowning. Good. Be ready for anything as you move forward, as you’ll be met with six octopods who will immediately rush you! Take ’em out and be ready to grind some rails, brah! Before you take the boost, ink the surrounding area, go into squid/octo form and then take the boost, but DON’T LET GO OF ZL. You will need to be holding ZL to successfully land inside the inkrail. Be very cautious in jumping from inkrail to inkrail, as it’s incredibly easy to misjudge the depth.
As you make it to the following platform with two octarians, dispatch them and get ready for more rails! But, rather than two octotroopers, this time you’ll have to fend off an octosniper. This isn’t terribly difficult to pull off, as they tend to telegraph their shots. So, take your time to ensure you’re not just dodging their attacks, but also sticking the landing. When you get close enough to defeat the octosniper, do so, then land on the wood platform they were camped out on. It’s time for a familiar obstacle.
Phase 1.6: More Rotating — and Revolving — Platforms …

I won’t lie — from here on, it’s incredibly easy to make a mistake in the heat of the moment. To avoid this for you, we’re going to try and remove any risk of small mistakes. Stand on the north face of the platform and ink the closest rotating platform. Ink it to the degree that you could swim against the grain if needed. Ideally, you won’t need to be here long, but it’s best to prepare for any eventuality. Don’t jump over yet!
Instead, stand on the north-west face of the wood platform and throw several burst bombs — the ones that explode instantly, like a water balloon — on the rotating platform furthest away. Your goal should be painting both of these rotating platforms so you can, theoretically, jump from surface to surface without much stress. If you can pull this off, you’ll land on another wood platform that’s connected to an L-shaped surface that’ll lead into the final obstacle of the first section.
Standing at the edge closest to the obstacle, you’ll notice it’s comprised of several revolving platforms that are submerged in water before resurfacing. I have good news, however — the water doesn’t wash away ink! So, you’ll want to apply the same strategy as before here. Ink clear pathways onto each of the revolving platforms so that you can leap from platform to platform with ease. As you get close to the platform with the launchpad, ink a path upwards and take the leap. If successful, you’ll have reached the first checkpoint of After Alterna, and you’ll be headed into an even more frustrating section of this level.
Good luck.
If you’d like to see more guides covering topics in Splatoon 3, including Ability Chunks Explained, Splatoon 3 Shooter Guide: Tips, Build, and Perks, stick with Gamer Journalist!




Published: Oct 11, 2022 11:06 am