
With the release of the Operation: Seraph’s Shield mission for owners of Season of the Seraph in Destiny 2, comes a new exotic for players to earn. Bungie outdid themselves, this mission is full of secrets, amazing views, puzzles, and one of the funniest ways to die in the entire game. (Seriously, if players haven’t already, jump off the space station when going on a spacewalk. I promise it’s worth it.)
There is one aspect of this mission that can puzzle some players, or rather one room. One of the puzzles in the mission requires guardians to traverse a maze of tiles and lasers in a locked room. One wrong step and it’s instant death. Much like a similar room in Zero Hour, players must know the path to make it through without being cooked like popcorn.
It takes some memorization, and being burnt to a crisp a few times, but the maze isn’t that hard to figure out. Players just need to memorize and reference. Though if they’re looking for a quick guide on how to do it, they need not look further than here,
How to Solve the Microwave Maze in Destiny 2
As referenced throughout the mission, role specific buffs are key to getting through this maze un-microwaved. In this case, players will need the Scanner buff. Getting the buff is easy: kill the Fallen that has a yellow glow above their head. Once done, hold E on the symbol, and the buff is now yours.
The Scanner buff lets players see what needs to be hacked in order to move on from room to room. But more importantly, it shows you the path to victory in the microwave room. This is broken up into two parts, separated by two floors. On the top floor before entering the maze, players will find what terminals they need to hack in the microwave room. These terminals are grouped in three on the left, top, and right sides of the room. In each side only one terminal is correct, the others will trigger the death mechanic. Keep in mind that the correct terminals will change each time the mission is attempted, so keep a close eye on the terminals.
The bottom floor will show the microwave room through a window. With the Scanner buff, it will also show players the path to go on without dying.
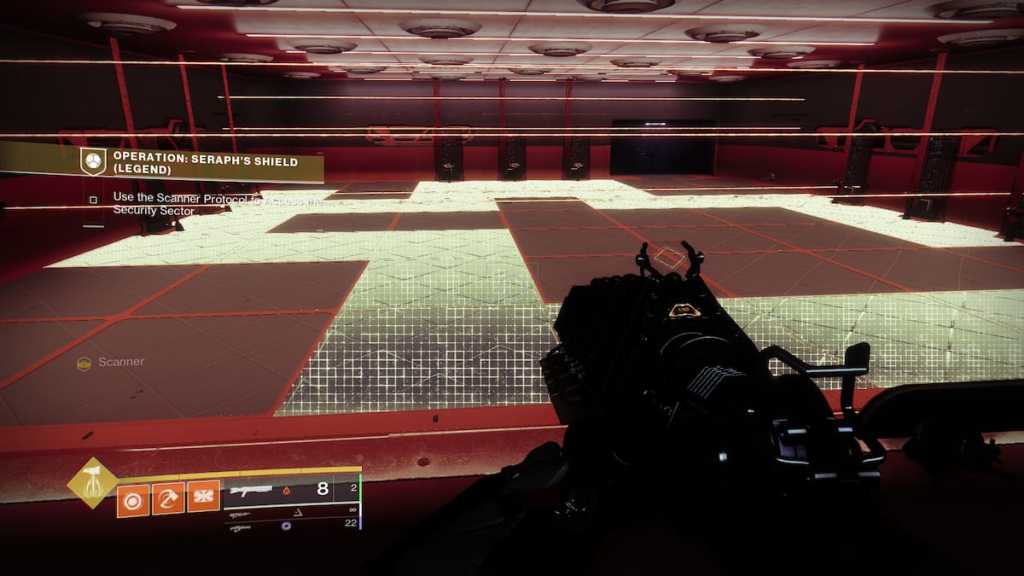
Luckily, the path is set in stone this time. Meaning it won’t change each time the mission loads up like the terminals. The room is divided into a 7×7 grid, in case the picture doesn’t help, the correct path is:
- Five steps to the left
- Two steps up
- Two steps left
- Two steps up
- Two steps right
- Two steps up
- Two steps right
- Two steps down
- Two steps down
- Three steps down
Be Sure to Memorize
Watch out for the lasers as well. Guardians will need to jump and crouch over them, as touching a single laser means instant death, and even worse: doing the puzzle all over again. Though the worst part of this room isn’t even the maze itself. Some might be wondering, with the Scanner buff, couldn’t they simply go into the room with the path showing?
Were it that simple.
To get in the microwave room, there is a field that automatically disables any buff picked up. Meaning as soon as you enter the room, it’s up to the player and their memory to traverse the tiled labyrinth. Upon death should players need another look at the path, the Scanner buff is available to pick up again. If not, another Fallen will spawn in with the Scanner buff. Take as much time as you need to memorize the grid. Or do what I did: take a picture and use it as reference.
With time, patience, and lots of vaporizations, eventually the microwave maze will be done, and players will be one step closer to acquiring the new highly modular Revision Zero Exotic pulse rifle.
Hopefully this guide on the microwave room helps a player out who was in a pinch in Destiny 2. You may want to head over to our Facebook for fresh new discussion and coverage every day. Guardians may also want to check out our guides on Orbital Engineering Shaft Platform Location – Destiny 2 and How to Get All 12 Eva Levante’s Dawning Upgrades in Destiny 2


Published: Dec 21, 2022 03:24 pm