The more time that players sink into Gameloft’s newly released Disney Dreamlight Valley, the more game mechanics they’ll find, opening up new doors for creativity and furthering gameplay. Though there are already tons of things to do in this early access life-sim, one thing that seems to go a bit overlooked is the photo mode mechanics that players can take advantage of. Whether used for quests and other in-game activities or to just grab a great photo for social media, the camera feature is something players will find useful. So, today we’re going to explain how players can take pictures in Disney Dreamlight Valley.
How to Take Pictures in Disney Dreamlight Valley
Taking pictures in Disney Dreamlight Valley serves a couple of different purposes. Though, as the game is currently only in an early access state, these purposes do have a ways to go and have the potential to be a bigger deal in gameplay for the future of this game’s lifespan. Currently, taking pictures is really only utilized in quests as some may need you to take pictures of people, places, or things in order to progress through them.
Aside from that, there isn’t really a scrapbook or photo album to save any of these pictures, which is a bummer because some of the possibilities here are pretty grand as this gorgeous little world begs to be photographed. However, players can still save these photos through different methods to keep them for themselves in order to create a photo album elsewhere, or share them online.
First, let’s explain how to take a photo in-game.
- Simply enter your tool wheel while in Disney Dreamlight Valley.
- Then, select the Camera option from the top left side of the wheel.
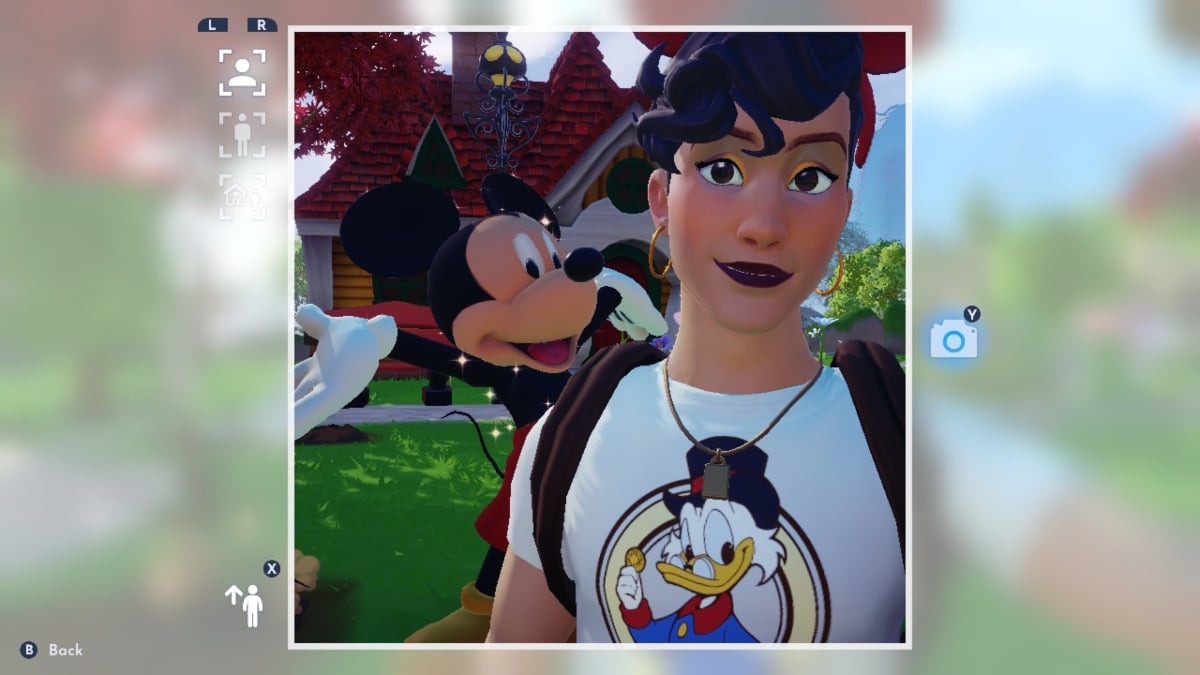
- Once in hand, go ahead and hit the button or key that corresponds to the “Photo” prompt on-screen.
- You’ll then be taken into photo mode.
- In photo mode, you’ll be able to change the distance of the photos taken.
- The first shot is a close-up selfie of your character, the second a distanced selfie of them, and the third is a distanced shot from behind your character.
- You can cycle through these three options using your shoulder buttons or whatever keys are designated to them if you’re on a keyboard.
- When ready to snap a pic, hit the button or key assigned to the glowing blue camera icon on-screen.
- Once finished, you can exit the photo mode by hitting whatever button or key is assigned to the “Back” prompt.
- Once your pic is snapped, if for a quest, the picture will be marked complete for that quest’s activities.
If you’re looking to save a picture for yourself, you’ll need to take a screenshot via whatever gaming platform you’re using, as again, these photos are not saved in-game. The Nintendo Switch, PlayStation consoles, and Xbox consoles all have a method of saving screenshots as well as do PCs. This is your only current method of saving these pictures.
So, that’s all there is to it if you’re looking to take pictures in Disney Dreamlight Valley! Have fun!
Related: 40 Most Valuable Items to Sell in Disney Dreamlight Valley


Published: Sep 7, 2022 03:47 pm