One of the most sought after trophies in theHunter Call of the Wild is the Diamond medal. If you’re new to the game, you may have no idea what they are or how to get them. Diamonds are the highest possible medal you can get from a harvest, except for the elusive Great Ones. There are specific requirements to keep in mind when going for Diamonds. This guide explains how to get Diamond in theHunter Call of the Wild.
In general, you can focus on taking out as many animals as possible if you’re playing by yourself. When you eliminate an animal, a new one will spawn in its place somewhere on the map. The replacement animal can be a random weight and have random stats, meaning it could be a Diamond-tier animal.
How to get Diamond in theHunter Call of the Wild
A Diamond is the highest trophy rating you can get from a harvest in theHunter Call of the Wild. Achieving a Diamond can be challenging for players of all skill levels, but you can keep these three things in mind to understand what goes into determining your medal. To get a Diamond in theHunter Call of the Wild, you must:
- Check that the Trophy Rating meets Diamond requirements
- Ensure the animal level is maximum for its species (optional)
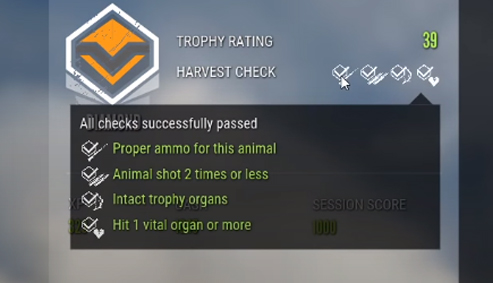
- Pass the Harvest Checks
- Proper ammo for the animal
- Hit animal two times or less
- Intact trophy organs
- Hit one or more vital organs
Trophy Rating
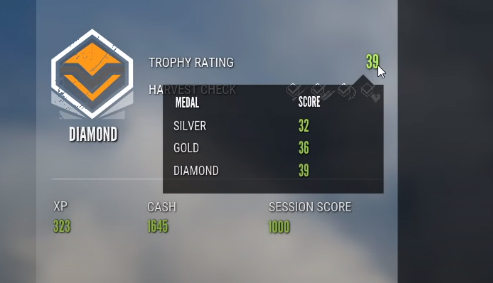
Trophy Rating is either an evaluation of the animal’s trophy or their weight. It is animal-specific, so comparing your Trophy Rating between two different species is meaningless. The Trophy Rating is what goes into determining your medal. Each species of animal has different diamond requirements, which you can see from the harvest screen. Here are the medal breakdown requirements:
- No Medal: Animal has no trophy organ
- Bronze: Trophy Rating under 20% of the maximum
- Silver: Trophy Rating is between 20% and 60% of the maximum
- Gold: Trophy Rating is between 60% and 90% of the maximum
- Diamond: Trophy Rating is 90% of the maximum
There is one medal ABOVE diamond, but it is scarce, and you should never bank on finding one of them. We’re talking about the Great One award.
On the harvest screen, hover your mouse over the number next to “Trophy Rating.” You will see a number listed there along with a dropdown that breaks down the requirements per medal.
Harvest Checks
One of the main things to pay attention to when going for diamonds is passing the harvest check. You can view this from the animal’s harvest screen under the trophy rating section.
Use the proper ammo
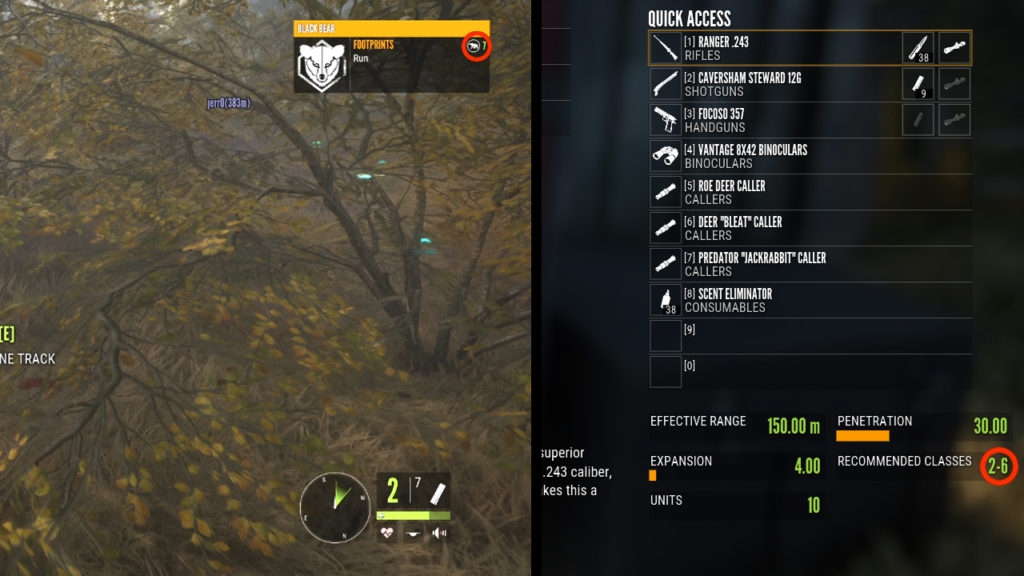
Using the proper ammo to hunt animals is essential when going for Diamond. The number on the top right of the animal’s stat panel is the class of the animal. You can then look at the ammo in your bag to see which classes of animals it covers. Highlight a type of ammo and look for the stat field labeled “recommended classes.” Always make sure your ammo type covers the class of the animal you’re hunting.
Hit animal two times or less
This harvest check is simple and means that you won’t pass if you shoot the animal more than two times. Using the correct ammo type and hitting a vital organ will likely cause the animal to bleed out in one shot or drop on the spot anyway.
Trophy organs intact
Another harvest check you can see on the harvest screen is the trophy organs. Let’s say you check the animal harvest screen, and it shows their trophy organ is the skull. If you see this, avoid going for a skull shot. As a general rule of thumb when going for Diamonds, don’t go for a skull shot unless you’re hunting ducks or rabbits. Those are the only two animals where it doesn’t matter where you shoot it since they are tiny.
Vital organ hit
A vital organ hit means a shot to the heart, neck, brain, liver, or lungs. The spinal cord does not ever constitute a vital organ hit, so you should aim for the organs above instead.





Published: Oct 30, 2020 04:55 am